
When and Why Duct Blast Testing
Duct Blast Testing
For an energy-efficient forced-air system, seal seams with mastic and test with a Duct Blaster

Image 1 of 2
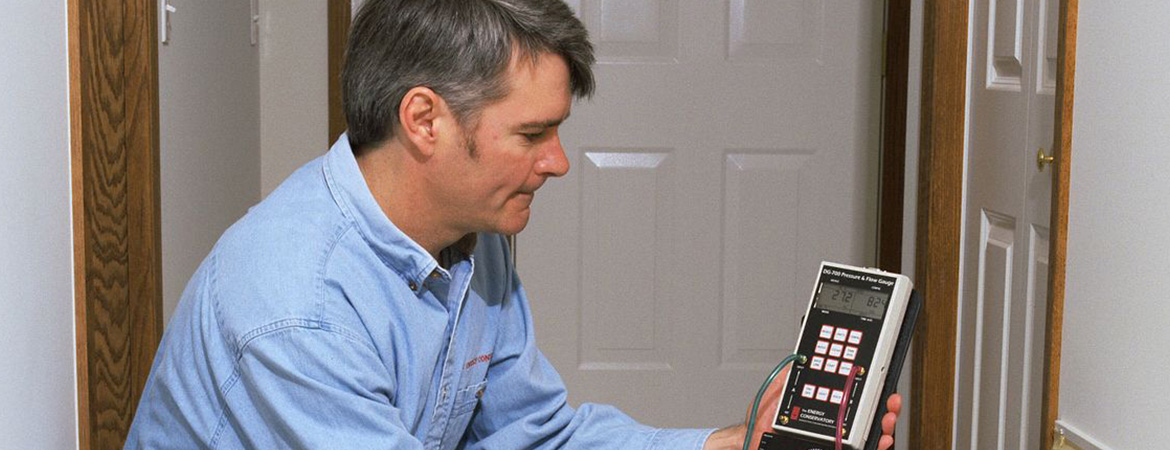
Testing ducts with a Duct Blaster.A Duct Blaster can be connected to a residential duct system at a large return-air grille or near the furnace. Once the duct system has been pressurized or depressurized to 25 Pascals, the air flow of the fan gives an indication of the duct system’s leakiness.
For years, Americans who would never put up with leaky plumbing pipes have been willing to accept leaky ducts. While water damage is hard to ignore, the damage caused by leaky ducts is more subtle. Yet leaky ducts not only waste huge amounts of energy — they can also lead to comfort complaints, moisture problems, mold, and rot.
Most green certification programs require builders to pay attention to duct tightness. Now that duct testing requirements are starting to appear in some local building codes, more and more builders are asking questions about the ins and outs of duct leakage testing.
Duct basics
Most green builders already know their duct basics:
- Duct leaks are very common; in many homes, duct leaks are responsible for significant energy losses.
- For ducts located in an unconditioned attic, any leaks in the supply system tend to depressurize a house, while return-system leaks tend to pressurize a house. Either condition can cause problems.
- Duct leaks outside of a home’s thermal envelope waste more energy than duct leaks inside a home’s thermal envelope.
- Even if ducts are located inside of a home’s thermal envelope, duct leaks can still connect to the outdoors. For example, supply system leaks in a ceiling between the first and second floors of a two-story home can pressurize the joist bay, forcing conditioned air outdoors through cracks in the rim joist area.
- It’s much easier to seal duct seams during new construction than in an existing house.
Characteristics of a good duct system
A good duct system:
- Has been designed to meet ACCA Manual D requirements, with each duct carefully sized to provide the airflow needed to meet room-by-room heat loss and heat gain calculations;
- Has been designed so that duct runs are as short and straight as possible;
- Does not use building cavities (for example, panned joists or stud bays) as ducts;
- Locates all ducts within the home’s thermal envelope;
- Includes ducts or air paths that allow return air to flow back to the air handler from every room with a supply register;
- Has all seams sealed with duct mastic; and
- Has been tested for duct leakage.
Code requirements for duct sealing
Although model codes have included duct-sealing requirements for years, enforcement has been spotty or nonexistent. For example, a 2001 study of 80 new homes in Fort Collins, Colorado, found that the number of homes that complied with code duct-tightness requirements was zero. Astonishingly, the average duct leakage in the studied homes was 75% of total system airflow.
Another 2001 study found that Massachusetts Energy Code requirements for duct sealing were widely ignored. Researchers who inspected 186 new Massachusetts homes reported that “serious problems were found in the quality of duct sealing in about 80% of these houses.”
The 2006 International Residential Code (IRC) requires (in section N1103.2.2) that “Ducts, air handlers, filter boxes and building cavities used as ducts shall be sealed.” Elsewhere, in section M1601.3.1, the IRC requires that “Joints of duct systems shall be made substantially airtight by means of tapes, mastics, gasketing or other approved closure systems.” Hardware-store duct tape is not an approved tape.
Mandatory testing
Builders will soon need to get up to speed on duct testing, since recent code changes will require that all residential duct systems except those that are located entirely within a home’s thermal envelope will need to be tested for leakage.
If some ducts are outside of the thermal envelope, the 2009 IRC will require duct tightness to be verified by either a “rough-in test” or a “post-construction test.” Either test requires all register boots to be taped or otherwise sealed during the test.
The threshold for the rough-in test is total duct system leakage of 6 cfm per 100 square feet of conditioned floor area (when tested at 25 Pascals). If the air handler is not installed, the total leakage must be less than or equal to 4 cfm per 100 square feet of conditioned floor area.
The threshold for the post-construction test is duct system leakage to outdoors of 8 cubic feet per minute (cfm) per 100 square feet of conditioned floor area when tested at 25 Pascals. Alternatively, total duct system leakage must be less than or equal to 12 cfm per 100 square feet of conditioned floor area.
Testing for duct leakage
Energy auditors have developed several methods for testing duct tightness. These methods vary from fast and dirty to time-consuming and accurate. Builders interested in tight duct systems should familiarize themselves with the range of available duct testing options:
- Using only a blower door;
- Using a blower door and a pressure pan;
- Using a Duct Blaster;
- Using a Duct Blaster and a blower door; and
- Using a theatrical fog machine.
A fast, rough test
In Residential Energy, authors John Krigger and Chris Dorsi describe a quick (but not particularly accurate) method for estimating duct leakage: “The simplest way to estimate duct leakage in cfm50 is to perform two blower-door tests: one with the home’s registers sealed with paper and tape, and one without. Subtracting the two readings provides a very rough estimate of total duct leakage.”
Because of the inherent inaccuracies of this method, it is rarely used.
The pressure-pan method
A pressure pan is a diagnostic tool consisting of a metal pan (similar to a cake pan) connected by a tube to a manometer (that is, a pressure gauge). The device is used to temporarily cover a forced-air register to measure the pressure exerted on the pan by a blower door.
To conduct a pressure-pan test, you need a pressure pan and a blower door. Here are the basic steps:
- A blower door is used to depressurize the home to 50 Pascals.
- The air handler fan is turned off.
- The tester then blocks each register (one at a time) with the pressure pan and records the reading of the pressure-pan manometer. (The manometer shows the pressure created by air leaking into the duct system.) Typical readings of the duct system pressure (with respect to the house pressure) range from 1 Pascal to 45 Pascals.
- The higher the reading, the leakier the duct run.
In a Home Energy magazine article, “Pressure Pans: New Uses and Old Fundamentals” (January/February 1998), Jeffrey Siegel and Bruce Manclark explain, “A duct system at 0 Pa is entirely within the pressure envelope of the house and has no leaks to the outdoors. A system approaching 50 Pa is essentially outside the pressure envelope, meaning that it has catastrophic leakage to the outdoors.”
It’s important to note that the pressure pan readings don’t really provide measurements of duct leakage; rather, they provide a method for comparing the relative leakiness of several duct runs in the same home.
That hasn’t prevented some energy experts from recommending thresholds for pressure-pan measurements. According to Krigger and Dorsi, “Registers of newly installed ducts should read less than 0.5 Pascals and existing duct registers should read less than 1 Pascal after being sealed.”
In “Duct Improvement in the Northwest,” (Home Energy magazine, January/February 1996), author Ted Haskell provides this advice for existing homes: “Houses with fewer than three pressure-pan readings above 2 Pa are unlikely to be cost-effective to seal.”
The pressure-pan test has several virtues. First, it is fast — especially when an auditor is already conducting a blower-door test. Second, it identifies which of a home’s duct runs are the leakiest, so that a contractor knows where to focus duct-sealing efforts.
However, many experts warn contractors not to jump to conclusions based only on the pressure readings recorded during a pressure-pan test.
As with many other diagnostic tests — infrared scanners come to mind — it takes an experienced auditor to interpret the results of a pressure-pan test. “Pressure-pan readings are difficult to interpret, and the same number can reflect quite different leakage rates in different houses,” wrote Siegel and Manclark. “The disadvantage of the pressure-pan test is that it is more art than science. … The one exception is when homes have very similar duct geometry and installation, as is the case with manufactured homes or identical homes in a subdivision.”
The Duct Blaster test
The most common method for testing the tightness of a duct system is the duct-blower test (also known as the Duct Blaster test). A duct blower resembles a miniature blower door; the most common brand is the Duct Blaster, manufactured by the Energy Conservatory in Minneapolis.
Here are the steps:
- All supply registers and return grilles are sealed with polyethylene and tape.
- The air handler fan is turned off.
- The Duct Blaster is set up and attached to the duct system (near the furnace or at a large return-air grille).
- The manometer’s reference probe is inserted into the air handler plenum.
- The Duct Blaster is turned on to pressurize the duct system to 25 Pascals (a pressure which represents typical operating pressures for forced-air systems). The airflow through the Duct Blaster fan (which is displayed in cfm on the Duct Blaster’s manometer) equals the flow escaping through leaks in the duct system. The results are reported as “cfm @ 25 Pascals” or “cfm25.”
Although this test reveals the leakiness of the duct system, it doesn’t tell the tester where the leaks are located; nor does it quantify what percentage of the leakage is leakage to the outdoors. Moreover, it doesn’t tell us how much a duct system leaks under normal operating conditions — conditions which may differ from Duct Blaster pressurization to 25 Pascals.
According to Krigger and Dorsi, “Leakage ranges from less than 50 cfm25 for a fairly tight duct system to more than 500 cfm25 for a very leaky duct system.”
Builders hoping to comply with the 2009 IRC duct-testing requirements will need Duct Blaster test results showing total duct leakage equal to or less than either 6 or 12 cfm (depending on whether it is a rough-in test or a post-construction test) per 100 square feet of conditioned floor area.
Using a Duct Blaster to test duct leakage to the outdoors
Energy auditors often want to know how much of a duct system’s leakage is leakage to the outdoors. Leakage to the outdoors can occur when air escapes through a leak in a duct installed in an unconditioned attic. It is also possible for a portion of the leakage through a duct that seems to be within a home’s thermal envelope to turn out to be leakage to the outdoors, since such leaks can pressurize joist bays, forcing conditioned air through rim-joist cracks.
One quick-and-dirty indication that a duct system has sizable leaks to the outdoors occurs when an auditor notices obvious air flow from forced-air registers during a blower-door test. Since the house is strongly depressurized, the airflow represents exterior air; and since it’s coming from the duct system, the airflow is a sign that the duct system has leaks that connect with the outdoors.
To determine how much duct leakage is leakage to the outdoors, a tester needs a blower door and a Duct Blaster. Here are the steps:
- A blower door is set up in an entry door.
- All supply registers and return grilles are sealed with polyethylene and tape.
- The air handler fan is turned off.
- A pressure tap is temporarily installed in the duct system to measure the pressure of the duct system with respect to the house.
- Another manometer or tube is set up to measure the outside pressure with respect to the ducts.
- The Duct Blaster is set up and attached to the duct system (usually near the furnace).
- The blower door is turned on and the house is pressurized to 25 Pascals.
- The Duct Blaster is turned on to pressurize the duct system; the Duct Blaster fan is adjusted until there is no pressure difference between the ducts and the house. At that point, all of the air going through the Duct Blaster is going outdoors through duct leaks. The airflow indicated on the Duct Blaster’s manometer (in cfm) quantifies that duct leakage to the outdoors.
Obviously, duct leaks to the outdoors represent heating or cooling energy that is lost.
Testing ducts with a fog machine
To find the location of duct leaks, nothing beats a theatrical fog machine.
Gary Nelson, the founder of the Energy Conservatory, describes the method: “You tape up all the registers and you pressurize the ducts. Then you introduce fog into the Duct Blaster — you aim the fog nozzle at the fan blades, without letting the fog get drawn into the vent holes in the motor, and you watch where the fog pours out. Sometimes you may be working with an HVAC contractor who says, ‘This is a good duct system. This is the way we have always done it. This is normal.’ Well, when you show them the fog coming out of the leaks, they shut up really fast.”
Sealing the leaks that matter most
The mechanics of duct sealing are beyond the scope of this article, but it’s worth noting:
- Duct seams need to be mechanically fastened (using sheet-metal screws for galvanized ducts and compression straps for flex duct) before being sealed.
- For sealing most duct leaks, mastic works better than any tape. (Bruce Manclark calls tape “the band-aid of the HVAC industry.”)
- Mastic is messy, so wear old clothes when you apply it.
- Install mastic “as thick as a nickel.”
- Cracks or seams wider than 1/8 inch need to be repaired with fiberglass mesh as well as mastic.
It’s important to prioritize duct-sealing efforts so that the most important leaks are addressed first. As Philip Fairey, the deputy director of the Florida Solar Energy Center, likes to say, “Duct leakage is like real estate — it’s all about location, location, location.”
- In existing homes, it’s surprisingly common to find disconnected duct components — takeoffs that are coming loose from ducts or ducts disconnected from register boots — in attics or basements. Such disconnected ducts can waste tremendous amounts of energy.
- Leaks connected to the outdoors are more important than leaks inside the home’s thermal envelope.
- Holes that see high pressures — in other words, holes near the air handler — are more important than distant holes that see relatively low pressures. Bruce Manclark’s mantra is, “Follow the pressure: boots for show, plenums for dough.”
- Most furnaces have many bad leaks close to the blower fan, including leaks in the furnace jacket seams, leaks between the furnace and the plenums, and leaks between the duct takeoffs and the plenums.
- Supply system leaks waste more energy than return system leaks.
Measuring air flow
Anyone who commissions a duct system needs to learn how to measure airflow at registers and grilles. Manufacturers offer an array of accurate (and expensive) instruments to measure airflow. However, builders who need to troubleshoot problems may be interested in several low-cost methods of measuring airflow:
- The August 2002 issue of Energy Design Update describes how to build a homemade flow hood using a cardboard box and a $90 digital anemometer.
- Two Lawrence Berkeley National Laboratory engineers, Iain Walker and Craig Wray, have written a paper describing a method of measuring airflow with a “calibrated” laundry basket and a manometer.
- Terry Brennan promotes a method of measuring bath exhaust fan airflow with a cardboard box and a credit card.
- The easiest way to measure airflow at a supply register is the garbage bag technique developed by Don Fugler of the Canada Mortgage and Housing Corporation.
Duct testing is coming to your job site — soon
For decades, plumbers have routinely tested newly installed supply and drain pipes. Meanwhile, most HVAC contractors have gotten away with leaky, untested duct systems. However, the tide is now turning. In the future, testing residential duct systems for leaks will become a routine part of residential construction.